In this chapter, we explore how to install and configure Orchestrator. We will be looking at the following recipes:
Getting Orchestrator running in 5 minutes (or less)
Deploying the Orchestrator appliance
Installing Orchestrator on Windows
Two ways to configure Orchestrator
Important Orchestrator base configurations
Configuring Orchestrator with external LDAP or Active Directory
Integrating Orchestrator into SSO and vSphere Web Client
Configuring an external database
vRealize Orchestrator (vRO) is the new name (since October 2014) of vCenter Orchestrator (vCO). In this book, we will refer to vRO/vCO simply as Orchestrator.
This chapter is dedicated to the configuration of Orchestrator and discusses how to set the tone for your Orchestrator deployment. Configuring Orchestrator wasn't easy in the past; therefore, not many people really used it. But now, the initial configuration is already done out-of-the-box and people can start using Orchestrator without too much fuss. However, if one plans to use Orchestrator in a production environment, it is important to know how to configure it properly.
There are four different Orchestrator versions. One version is shipped with vCenter Server and the other with vRealize Automation appliance. Then, there is the Windows-based installation and a preinstalled Linux appliance.
The vRealize Automation (formerly vCloud Automation Center or vCAC) appliance is shipped with a preinstalled and preconfigured vRO (Orchestrator). Orchestrator installed on vRA is already configured and works the way the normal Orchestrator appliance does.
If you are using the vRA-integrated version, just read all the recipes in this chapter and the next chapter as if you are using the appliance.
You can read more about vRA Orchestrator integration in the introduction to Chapter 7, Working with VMware Infrastructure.
The question most people are asking these days is what type of Orchestrator should one use for a production environment or which one is recommended.
There isn't really a right answer. The appliance runs on Linux and therefore consumes less CPU and memory and, saves money on a Windows license. However, more people are familiar with Windows than with Linux.
There is another fact that one should be aware of. VMware has already announced that the Windows version update from 5.1.x to 5.5.x will not update the database. This, in my personal opinion, indicates that the Windows version doesn't receive as much attention from VMware as the appliance version. However, the version that is installed along with vCenter is pretty integrated; see the first recipe of this chapter.
A consideration you should be aware of is that, depending on your Windows security settings or other installed applications, such as antivirus, backup agents, or infrastructure discovery agents, your Windows Orchestrator installation might be impaired.
So, what is right for you? My personal preference and that of most of the VMware consultants I know is the appliance; it is easy to use, install, and update. However, keep in mind that Windows works just as well.
Another question that is constantly asked is: Should one install Orchestrator on the same server as vCenter or vRA? As with the issue of appliance or Windows installation, it really depends on the objective of your Orchestrator installation. Installing Orchestrator on a vCenter Server where the Single Sign-On (SSO), the Web Client, Inventory, and vCenter services are already competing for resources makes quite an impact. If the Orchestrator installation is aimed at automating a sizable production environment, sharing Orchestrator resources with vCenter isn't such a great idea. For a small environment, a shared vCenter/Orchestrator VM can be quite a good solution.
The vRA-integrated Orchestrator installation is also fine for smaller environments; however, if you plan to automate a production environment with vRA, it is recommended that you use a separate Orchestrator installation and maybe even an Orchestrator cluster (see Chapter 2, Optimizing Orchestrator Configuration).
What it basically comes down to is managing the Java heap sizes of the different services (see the Tuning Java recipe in Chapter 2, Optimizing Orchestrator Configuration). A correct sizing of all the Java heap sizes (vCenter services as well as Orchestrator) will allow a good coexistence of all services. However, you should consider issues such as manageability as well as the ability to monitor and update all the services.
In this recipe, we will get Orchestrator up and running using the Orchestrator version that is installed along with vCenter or vRealize Orchestrator.
You either need administrative access to the Windows OS of your existing vCenter Server (5.1 or higher) installation, or you need a functional vRealize Automation installation (see the introduction to Chapter 7, Working with VMware Infrastructure, for more information).
This recipe is not the same for vCenter-integrated and vRA-integrated Orchestrator implementations. There is a slight difference.
On your marks, get set, GO!
Follow these steps if you are using the vCenter-integrated Orchestrator.
Log in to the Windows OS of your existing vCenter installation.
Open the Services—for example, for Win 2008 R2, navigate to Start | Administrative Tools | Services.
Find the VMware vCenter Orchestrator Server service.
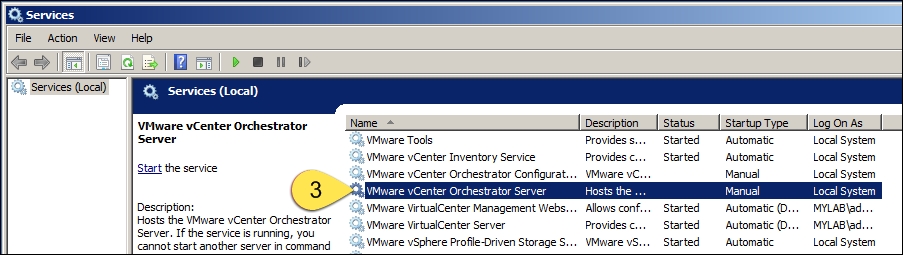
Right-click and select Start. If the service fails to start, have a look at the There's more... section of this recipe. The first start might take a while and Windows might complain about it, but just have patience.
When the service has started, use vCenter Orchestrator Client to connect to Orchestrator. You'll find the client by navigating to Start | VMware | vCenter Orchestrator Client.
Enter
localhost:8281as Host name,administrator@vsphere.localas User name with the corresponding password, and click on Login.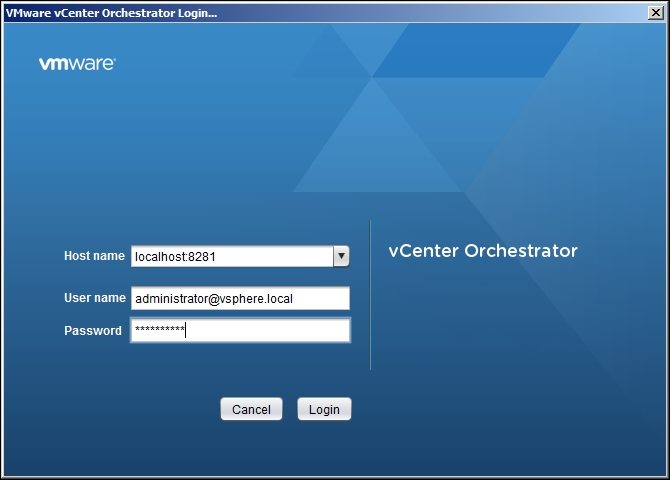
Follow these steps if you are using the vRA-integrated Orchestrator:
Open a web browser and enter the IP or FQDN of the vRA appliance.
Click on the vRealize Orchestrator Client link.
Enter
[IP or FQDN of the vRA appliance]:8281as Host name,administrator@vsphere.localas User name with the corresponding password, and click on Login.
Finished! Orchestrator is up and running.
When you install vCenter, you also automatically install Orchestrator; however, what you probably don't know is that the installer also configures Orchestrator to use the vCenter database, registers itself with SSO, and configures the vCenter plugin. Orchestrator is now easily accessible and fully configured to work with vCenter/vRA.
That said, one needs to understand that we have just started another hungry service on vCenter/vRA VM. As already discussed in the introduction, you might want to rethink this.
Looking at how the vCenter-integrated Orchestrator is configured, we find that the whole configuration process is triggered by the vco.properties file in the C:\Program Files\VMware\Infrastructure\Orchestrator directory. It contains all relevant information, but no passwords.
If you look into Orchestrator's configuration using the Orchestrator Configuration tool (see the Two ways to configure Orchestrator recipe in this chapter), you will find the following configurations:
In the Network section, the vCenter and the SSO SSL certificates have been added.
In the Authentication section, SSO is configured. If we log in to the SSO server, we find an existing group called vCOAdministrators and that the administrator (@vsphere.local) is a member of this group. We also find that Orchestrator is registered as an application user.
In the Database section, there is a new and unique database type: vDB. This is a connection to the ODBC drivers you set up for vCenter.
In the Licensing section, Orchestrator has been licensed with the vCenter license key.
Last but not least, the vCenter plugin is configured with vCenter details.
This all makes the vCenter Orchestrator installation the most easy to use for beginners. Basically, you only have to start the Orchestrator service on vCenter Server and you are ready to go.
If you get an error while starting the Orchestrator service, have a quick look at C:\Program Files\VMware\Infrastructure\Orchestrator\app-server\logs. There is a file called server.log. This is the logfile for the Orchestrator service. The most common problem at this point is that the database cannot be accessed. If this is the case, I would recommend switching the database type to embedded.
To fully integrate Orchestrator into your vCenter, continue with the Integrating Orchestrator into SSO and vSphere Web Client recipe in this chapter as well as the recipe Orchestrator and vSphere Web Client in Chapter 5, Basic Orchestrator Operations.
We will now deploy the Orchestrator appliance based on Linux.
We can deploy the Orchestrator appliance on either a vSphere environment or on VMware Workstation (or Fusion if you are a MAC user).
The Orchestrator appliance needs the following (defaults):
Two vCPUs at 2 GHz (less is OK, but it will be slower)
3 GB memory
12 GB disk space
One IP that is either a fixed IP or via DHCP
In this recipe, we will learn how to download and deploy Orchestrator.
Navigate to http://vmware.com and select Downloads.
Enter
Orchestrator appliancein the search text box and press Enter.Select the latest version from the menu.
Download the file that ends in
.ova.
Right-click on the cluster or ESXi Server and select Deploy OVF Template....
The Deploy OVF Template wizard starts. Select the OVA file you have downloaded and click on Next.
Accept the EULA and click on Next.
Select a name (or accept the default) as well as the vCenter folder for the Orchestrator appliance and click on Next.
Select the cluster or ESXi Server or a resource pool for the Orchestrator appliance and click on Next.
Select the datastore you would like to deploy the Orchestrator appliance on and click on Next.
Select a network for the Orchestrator appliance and click on Next.
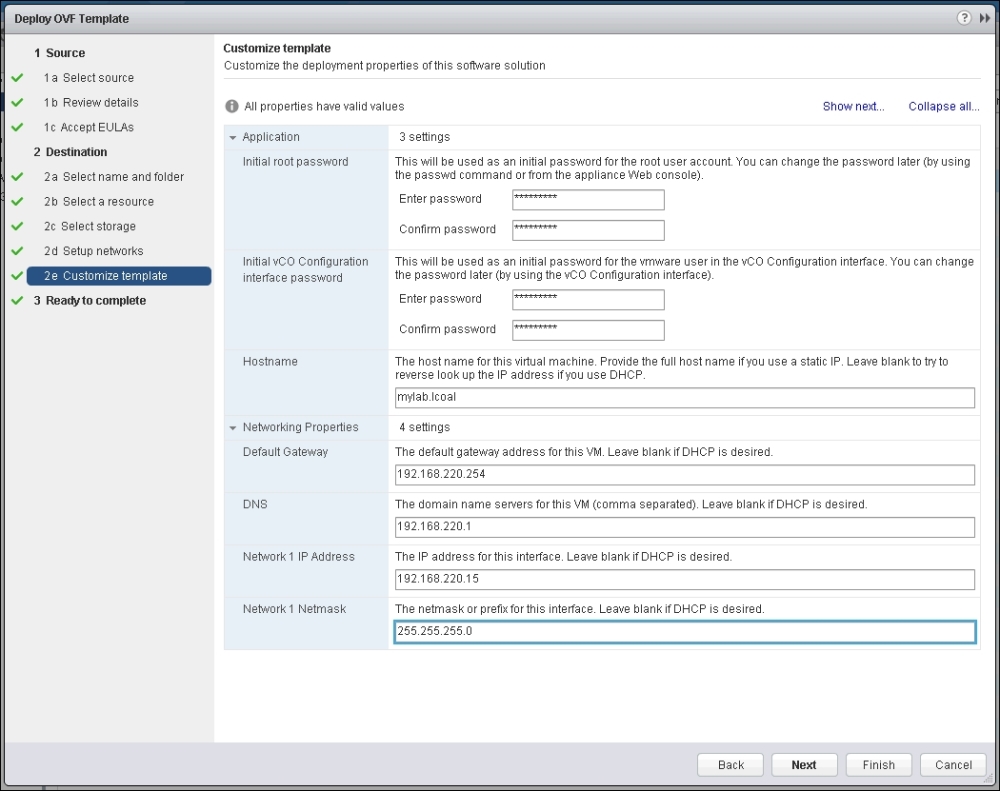
In the Customize template section, set a password for the root and the Orchestrator configuration account.
Set a hostname for the Orchestrator appliance.
If you want to use a fixed IP, expand the Network Properties section, enter all IP-related entries, and then click on Next. If you want to use DHCP, just click on Next.
Opt to power on the VM after deployment and click on Finish.
Wait until the VM has finished deploying and is powered on.
Open the console of the Orchestrator appliance and wait until the install process has completed and the VM console shows the following screen:
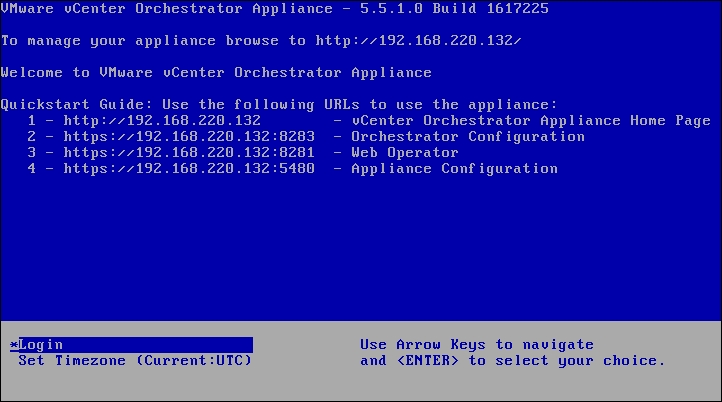
Open a browser and browse to the IP of the Orchestrator appliance (for example,
http://192.168.220.132).Depending on your environment, you might need to accept the SSL certificate. You are now on the Orchestrator home page with several useful links to all important Orchestrator topics.
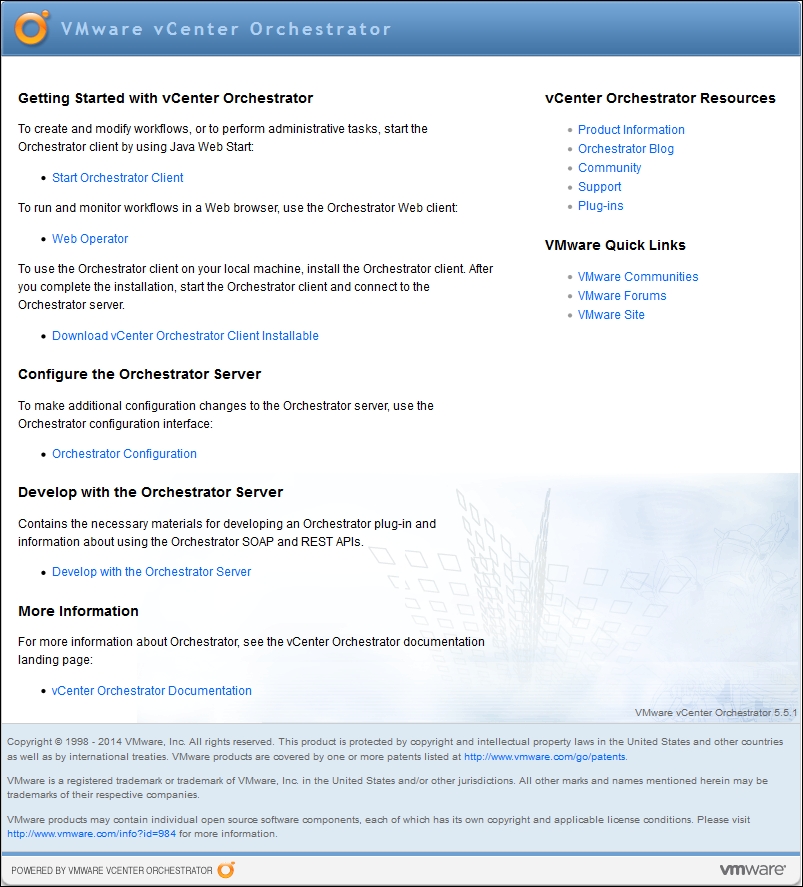
To open up the Orchestrator Client, click on Start Orchestrator Client.
Enter
vcoadminas user with the passwordvcoadmin.
vCO 5.5.2.1 appliance is a preconfigured Orchestrator installation that uses the following:
Suse Linux Enterprise Server (SLES) 11 Patch level 2
PostgreSQL 9.1.9
OpenLDAP 2.4.26
Everything is ready to run; however, no integration with vCenter or any external service is configured. The Orchestrator appliance comes with a 90-day evaluation license installed.
The LDAP has the following preconfigured entries:
|
Username |
Password |
Group membership |
|---|---|---|
|
|
|
|
|
|
|
|
Both LDAP and DB are protected to allow only local access to them.
If you want to deploy the Orchestrator appliance on VMware Workstation, the process of deploying the Orchestrator appliance differs from the one described in this recipe. Follow these steps instead:
Use Windows Explorer to navigate to the downloaded
.ovafile.Double-click on the OVA file. VMware Workstation opens up.
Select a name and a path for the new VM and click on Import.
Accept the EULA and wait until the VM is deployed.
You might need to select a different network (for example, Host-Only) depending on your lab environment.
Power on the VM and wait until the install pauses at the line indicated in this screenshot:
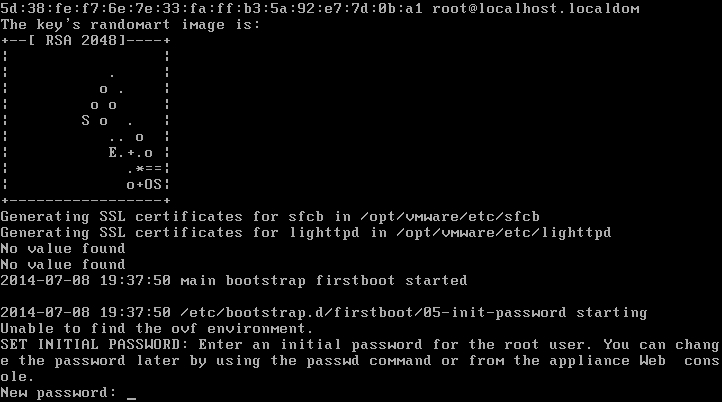
Then, enter and confirm a new password for the Orchestrator Configuration tool. The installation will now continue. Wait until it has finished.
The appliance will start with a DHCP address from Workstation. To set a static IP, you will have to access the admin interface of the appliance.
See the Tuning the appliance recipe in Chapter 2, Optimizing Orchestrator Configuration.
The Windows version of Orchestrator requires slightly more work to set it up.
To get the Windows install working, we need the following:
We assume that you are installing Orchestrator on a freshly installed Windows VM.
Insert the ISO image into the VM (for example, mount it via vCenter).
Use Explorer to browse to the
[CDROM]:\vCenter-Server\vCOdirectory.Execute the install file. The install wizard starts.
Skip the introduction by clicking on Next.
Accept the EULA and click on Next.
Select the path where you want to install Orchestrator and click on Next.
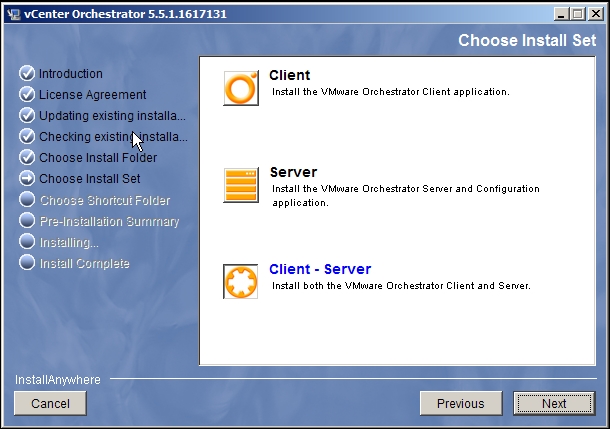
Click on Client - Server and then on Next.
Leave the icon selection alone and just click on Next.
We now need to make sure that Orchestrator's Windows services are starting and are configured correctly:
In Windows, open Services, for example, Win 2008 R2, and navigate to Start | Administrative Tools | Services.
Look for the service named VMware vCenter Orchestrator Server. Make sure it has started and is set to Automatic.
Setting the Orchestrator Configuration service to Automatic or starting it now is not really needed; we will start and stop it when required.
To access the vCenter Orchestrator home page, follow these steps:
Open a web browser and enter the
https://[ip of the vCO VM]:8281/vco/URL.To open up the Orchestrator Client, click on Start Orchestrator Client.
Enter
vcoadminas the user with the passwordvcoadmin.
Alternatively, you can access the web page from the VM itself by clicking on Start | VMware | vCenter Orchestrator Home Page.
The Windows Orchestrator version now also comes with embedded LDAP and database, making the first steps much easier.
The embedded database and LDAP can't be as easily accessed as with the appliance because there isn't really a need to do so. If you want to be serious about Orchestrator, you should use an external database and you will want to use at least your Active Directory (AD), if not SSO, as an authentication source.
The Windows installation also comes with a 90-day evaluation license.
In this recipe, we will learn how to access the Orchestrator configuration. There are two ways, both of which work; however, the future is in workflows.
We need an Orchestrator instance up and running, as described in the recipes about installing.
To use the Configuration tool, we just need a web browser; and for the workflow method, we need either a local Java install to start the Java Web Client or an installed Orchestrator Client.
There are two ways to configure Orchestrator; I would encourage you to explore both.
If you are using the Orchestrator appliance, read the Accessing the Orchestrator Configuration tool section of this recipe. If you are using the Windows or vRA-integrated Orchestrator, follow these steps.
Open a web browser and enter
https://[ip OR FQDN of Orchestrator]:8283.In the Orchestrator configuration login screen, enter
vmwareas the username and the password you assigned during the deployment. If you are using the Windows or vRA-integrated installation, the initial password isvmware. As soon as you are logged in, you will be requested to change the password.
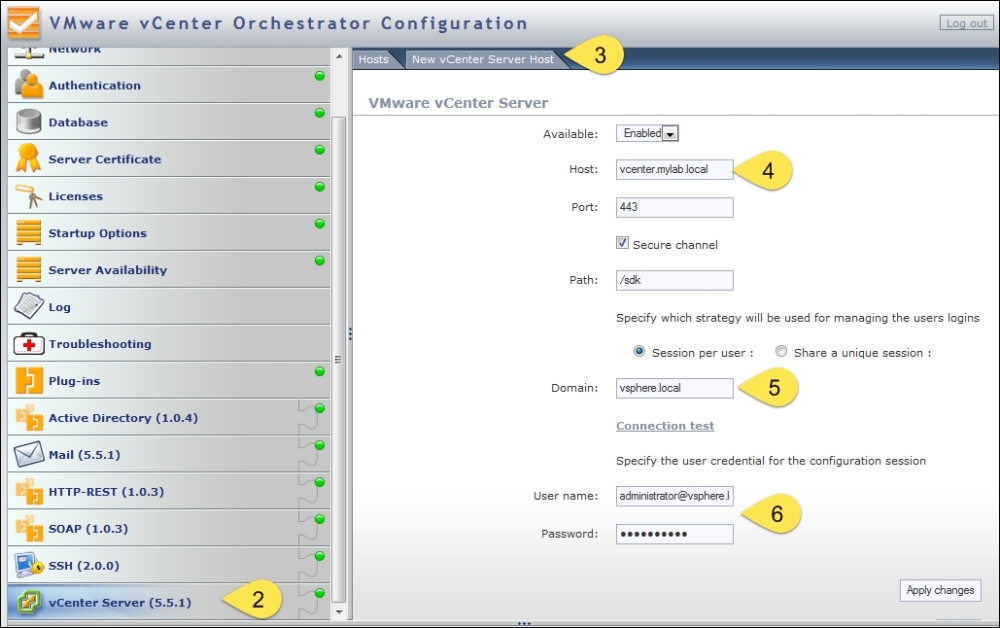
The Orchestrator configuration page opens as shown in the following screenshot:

Here are all the sections that can be used to configure Orchestrator.
Access the Orchestrator Client, open a web browser, and navigate to the Orchestrator home page
http://[ip of the vCO VM]:8281/vco/and click on Start Orchestrator Client.Enter your credentials, which are
vcoadminwith the passwordvcoadmin(except for the vCenter-installed Orchestrator version where you have to use the user accountadministrator@vsphere.local).You might need to accept the SSL certificate. Click on Install this Certificate… to not have this come up again and then click on Ignore.
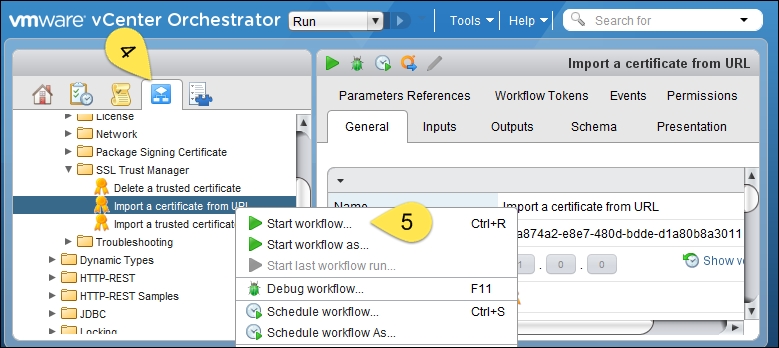
Once the Orchestrator Client opens, click on workflows (the blue icon with white in it) and then expand the tree, as seen in the next screenshot.
Here, you'll find all the Orchestrator-specific configuration workflow. Start one by right-clicking on it and choosing Start workflow.
After entering the required information and clicking on Submit, the workflow will start.
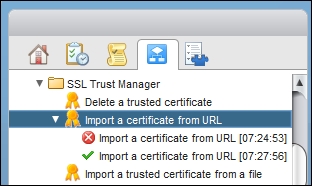
A green tick next to the workflow execution will show you that the workflow was executed without an error. A red cross shows that the workflow encountered an error and has stopped. See the How it works... section of this recipe.
The Orchestrator Configuration tool is an independent service in Windows as in Linux. The service doesn't require to be switched on all the time; it is more or less a one-off tool to get the initial deployment working.
The Orchestrator Configuration tool was commonly used to configure Orchestrator, and you will find countless websites still quoting it. It is a generally straightforward tool that helps you configure Orchestrator. The trick is to work your way down, starting with the General section. Every time you configure an item correctly, the little light next to the section title will switch to green. The light turns red if the item is not configured or is misconfigured. When you log in to Orchestrator for the first time, you will notice that all the lights are green; this is because it uses the preconfigured settings. You can still reconfigure all items to your own specifications.
VMware announced that the Configuration tool will be removed in future releases. From then on, the workflow method will be the way to do it. However, currently there is no workflow to import and configure plugins, so this still has to be done using the Orchestrator Configuration tool. The Configuration tool also gives a lot more options for most configuration items than the workflows. In addition, there is also no workflow for exporting or importing the Orchestrator configuration for backup (see the Backup and recovery recipe in Chapter 2, Optimizing Orchestrator Configuration).
It will be interesting to see how the final version of VMware's vision for configuration pans out.
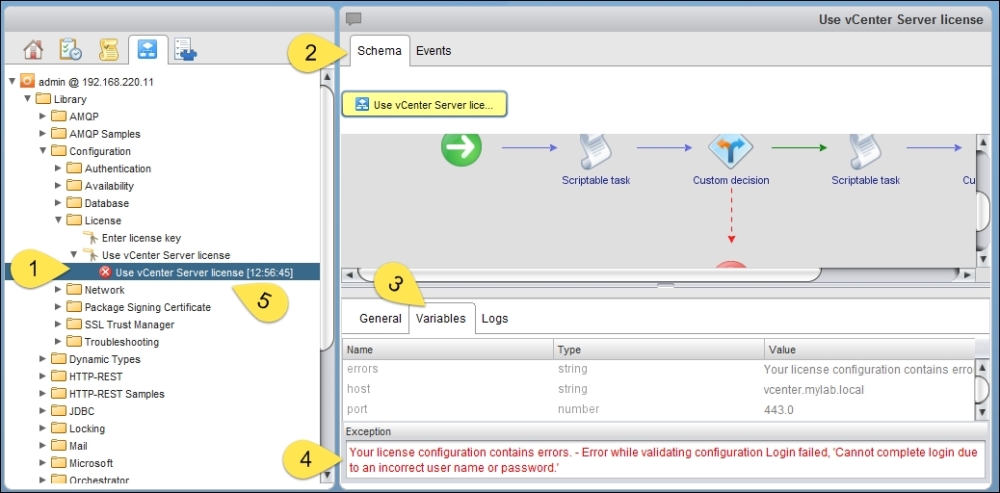
If the workflow doesn't run successfully, you probably will want to know why and resolve the error. To do so, follow these steps:
Click on the failed workflow execution. It has a red icon with a white X in it.
Click on Schema.
Click on Variables.
The error message is displayed in red.
To start the workflow again, just right-click on the failed execution and select Run Again.
This will start the workflow again; however, it preserves all the information you have entered already into the workflow. No retyping is needed as everything from the last run is still displayed in the forms. The only exceptions are passwords, which is a good thing.
There is actually a third way of configuring Orchestrator. Using the REST API of Orchestrator, you can connect to Orchestrator Server and run the configuration workflows. Showcasing this is beyond the scope of this book; however, you can find some instruction in the Orchestrator documentation and also in the Accessing the Orchestrator API via REST recipe in Chapter 6, Advanced Operations.
In this recipe, we will configure basic aspects of Orchestrator, such as licensing, network, and SSL certificates. It is highly recommended you work through this recipe before continuing on to add an external LDAP or database.
You need an installed and running Orchestrator. You should also be comfortable with using one of the methods described in the Two ways to configure Orchestrator recipe.
These are some basic configurations that have to be done to Orchestrator to make it production-ready. I will describe the use of the Orchestrator Configuration tool as well as the workflow method.
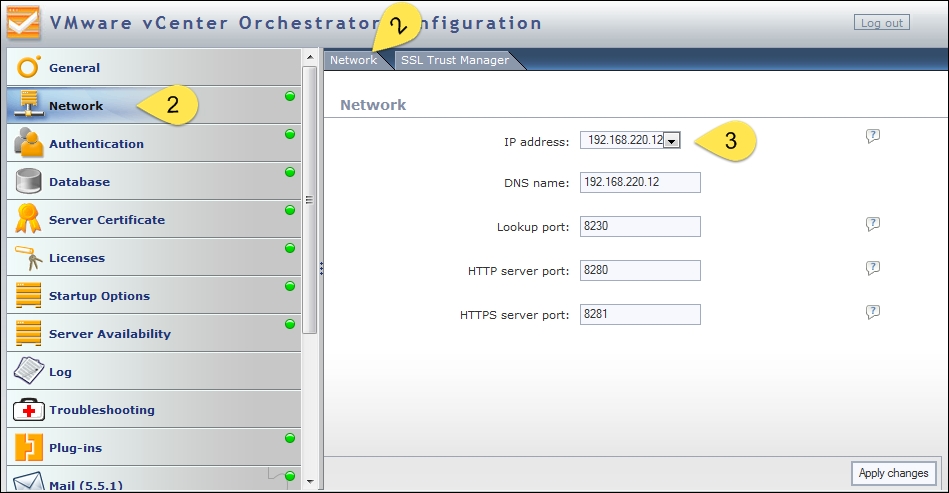
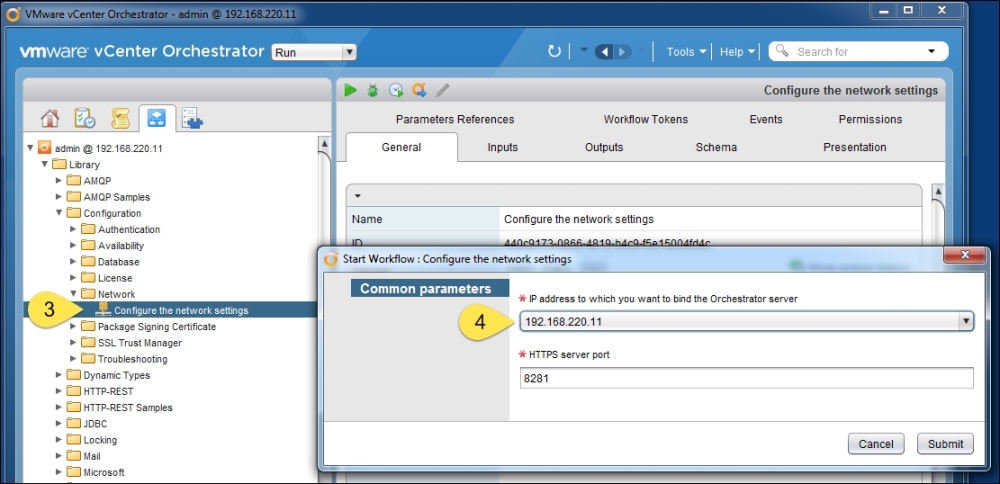
The network setting configures the interface by which Orchestrator communicates and the default is set to 0.0.0.0. You can change it to an IPv4 or IPv6 address. The Windows install has already configured the correct setting and only requires a change if you would like to switch to IPv6.
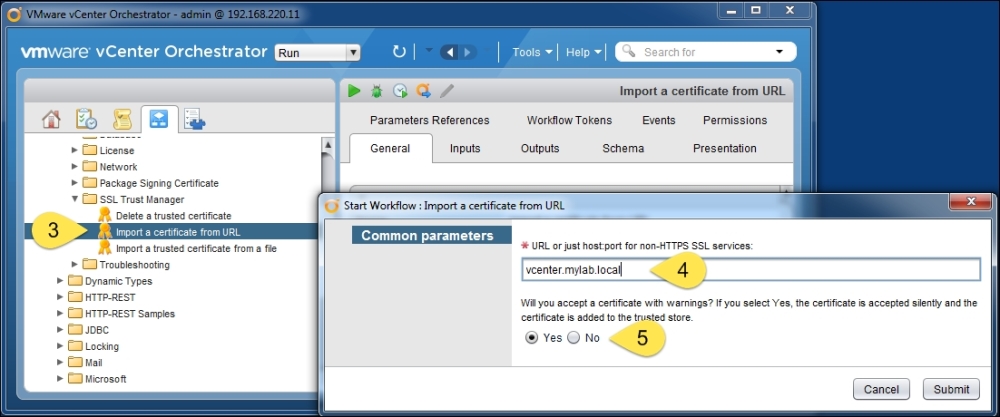
In order for Orchestrator to connect to any other SSL-based service, the SSL signature of this service has to be added to Orchestrator first. The SSL certificate for the Orchestrator Server itself is discussed in the Configuring the Orchestrator Service SSL certificate recipe in Chapter 2, Optimizing Orchestrator Configuration.

Navigate to Library | Configuration | SSL Trust Manager.
Right-click on the Import a certificate from URL workflow and select Start Workflow.
Enter the URL of the server that you wish to add.
Select Yes to accept the SSL certificate even if there are warnings and click on Submit.
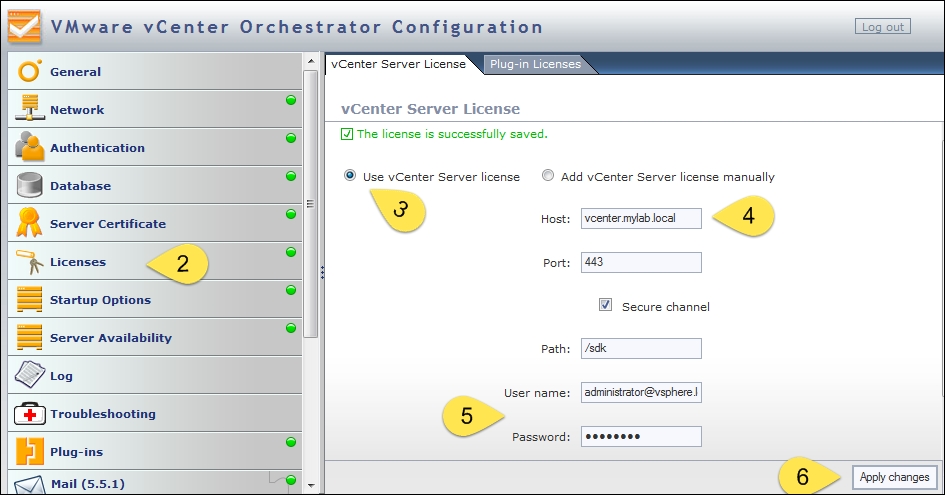
Both the Orchestrator Windows version and the appliance come with a 90-day evaluation license. Orchestrator is licensed with vCenter. The vCenter license key is the Orchestrator license key, and no extra purchase is required. However, if you are using the vCenter Essential license, you can only run workflows; you cannot create or edit them.
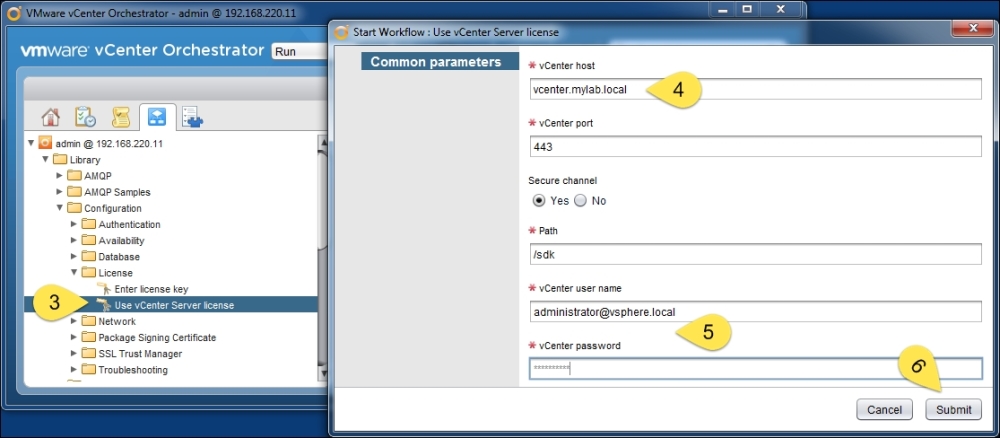
You can either enter a license key manually or connect to the vCenter Server to acquire the license.
Before you begin, add the vCenter SSL Certificate to Orchestrator.
Wait till the workflow has finished successfully.
The Server Package Signing certificate is an SSL certificate that is used to encrypt exports from Orchestrator, such as workflows and packages. It makes a lot of sense to at least personalize this with a self-signed certificate but be aware that, once created, it is not so easy to change.
It is not the SSL certificate of Orchestrator Server that is used for communication. The SSL certificate for Orchestrator Server is discussed in the Configuring the Orchestrator Server SSL certificate recipe in Chapter 2, Optimizing Orchestrator Configuration.
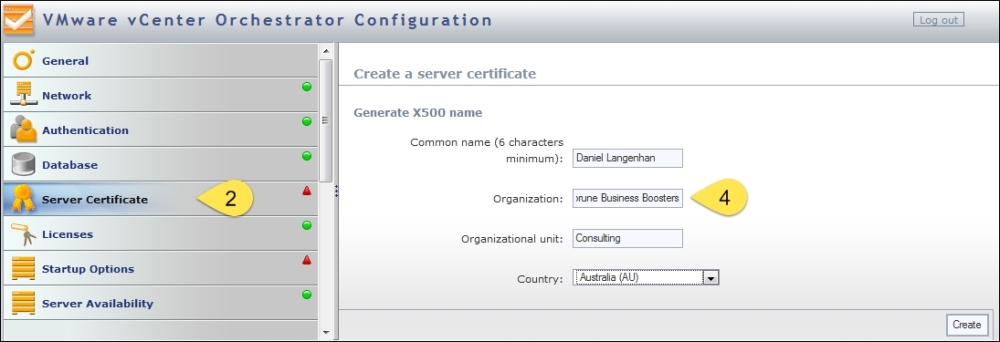
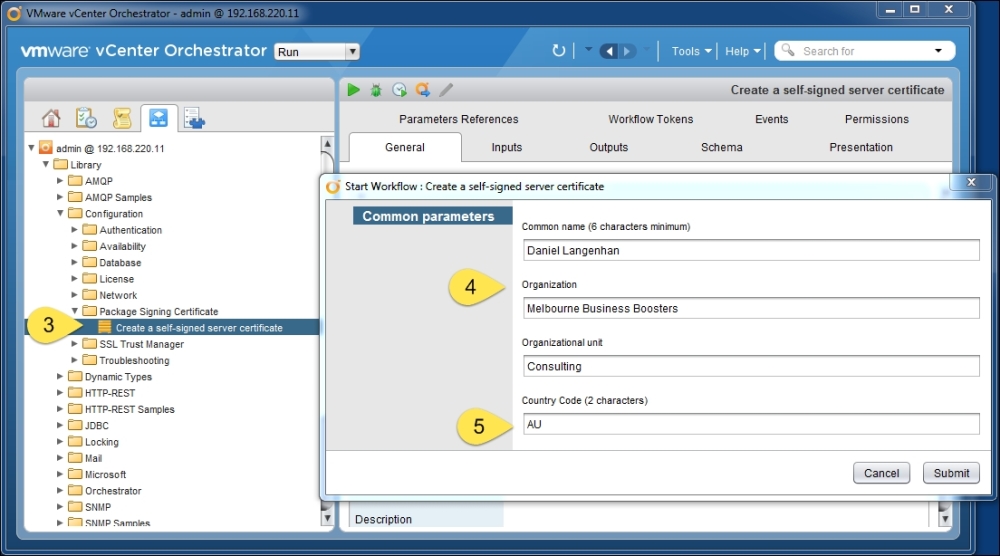
Navigate to Library | Configuration | Package Signing Certificate.
Right-click on the workflow Create a self-signed server certificate and select Start Workflow.
Enter the relevant information.
Choose the two-letter code for your country (search the Web for the SSL certificate's country code) and click on Submit.
Wait till the workflow is successfully finished.
You can see that, for the most part, the workflow method requires the same inputs as the Orchestrator Configuration tool; however, you have probably also noticed that there are not as many options in workflows as with the Configuration tool.
The settings we just applied are important and need to be done in order to make Orchestrator production-ready. The network configuration, the package signing, as well as the licensing need to be done only once. Importing an SSL certificate is an action that we will encounter more often. Every time we want to establish a secure connection (SSL) between Orchestrator and another server, we first have to import this server's SSL certificate.
Please note that, in earlier versions of Orchestrator, you had to restart the Orchestrator Configuration tool or the Orchestrator service after importing the SSL certificate; this is no longer the case.
The SSL certificate we configured here is used to sign exports or packages to be used with other Orchestrator installations. We will work with exports and imports in the Importing and exporting Orchestrator elements recipe in Chapter 5, Basic Orchestrator Operations. In the Working with packages recipe of that chapter, you will find some more detailed information about how to manage and use this SSL certificate.
At the time of writing of this book, there is a small bug that appears from time to time with the network configuration. When using the appliance and changing the network setting to anything else but 0.0.0.0, some things, such as the Orchestrator home page, won't work anymore. To fix the problem, check out this VMware community article available at https://communities.vmware.com/thread/477955.
Have a look at the Backup and recovery recipe in Chapter 2, Optimizing Orchestrator Configuration, to learn how to export and import the configuration.
In this recipe, we will configure Orchestrator with an external LDAP or Active Directory service. VMware best practice is to use Orchestrator together with SSO, which is described in the Integrating Orchestrator into SSO and vSphere Web Client recipe. This recipe doesn't work with the vRA-integrated Orchestrator.
You need a supported LDAP service configured and running. The following LDAP services are supported in vCO 5.5:
Windows Server 2008 Active Directory
Windows Server 2012 Active Directory
OpenLDAP
Novell eDirectory Server 8.8.3
Sun Java System Directory Server 6.3
We also need to create a group and a user in these services, so you should have access to these services.
You should be comfortable with using one of the methods described in the Two ways to configure Orchestrator recipe.
If your LDAP (AD) requires SSL (Kerberos), you will need to import the SSL certificate first (see the Important Orchestrator base configurations recipe in this chapter.
We will focus on linking Orchestrator to AD. Connecting Orchestrator to LDAP is pretty much the same procedure; for anyone who understands LDAP, this will be a breeze.
AD is basically the same as LDAP but most Windows administrators have problems with the LDAP representation of AD, which is why we focus on AD in this recipe.
We will configure SSO in the Integrating Orchestrator into SSO and vSphere Web Client recipe.
Before we can add an external LDAP, we need to configure at least one group and one user. To do this, perform the following steps:
Log in to your LDAP or AD.
Create an Orchestrator Administrator group and an Orchestrator Administrator user.
Make the Orchestrator Administrator user a member of the Orchestrator Administrator group.
For this example, I have created a user called vcoadmin as well as a group called vcoadmins in AD. The AD domain is called mylab.local.
Again, we will show both methods.
Click on the Authentication section.
In LDAP client, select Active Directory.
In the Primary LDAP host field, enter
mylab.localas the Active Domain DNS name.The standard port for Microsoft Active Directory LDAP is 389.
Enter
dc=mylab,dc=localas the root for your domain.If you have secured your AD with Kerberos, you need to activate SSL (don't forget to import the SSL certificate first).
The username can be entered in both formats: user@Domain or domain\user. The user can be any active user within the AD; however, its best to use Orchestrator Admin.
The user and group lookup base is easiest set to the root of your domain, for example,
dc=mylab,dc=local. However, if your AD or LDAP is large, performance-wise it might be better to choose a different root.The Orchestrator Admin group path can be easily found. Enter the name of the group (case-sensitive) and click on Search to the right.
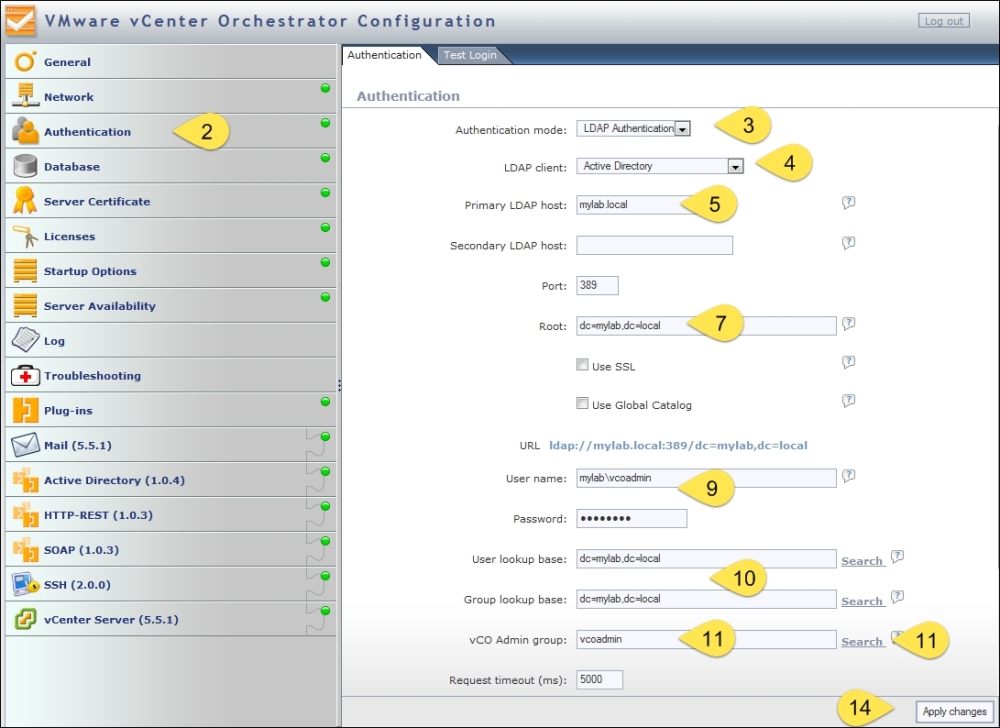
If the name has been entered correctly, the path should be shown. Click on the LDAP path. The path is now populated with the correct setting.

The rest of the settings can be left alone for most AD settings.
Click on Apply changes.
At this stage, you should try the test login described in the There's more... section of this recipe.
Click on Startup Options and then restart the Orchestrator Server.
Now, try to log in to the Orchestrator Client using the AD user.
Navigate to Library | Configuration | Authentication | LDAP.
Right-click on the workflow Configure Active Directory and select Start Workflow.
In the primary host, enter
mylab.localas the Active Domain DNS name.The standard port for AD LDAP is 389.
If you secured your AD with Kerberos, you need to activate SSL.
Click on Next.
Enter
dc=mylab,dc=localas the root for your domain.The username can be entered as user@mylab.local or domain\user. The user can be any active user in the AD; however, its best to use Orchestrator Admin.
The user and group lookup base is easiest set to the root of your domain, for example,
dc=mylab,dc=local. However, if your AD or LDAP is large, it might be performance-wise better to choose a different root.The Orchestrator Admin group needs to be constructed, but there is no automated tool for it. We use the
CN=vcoadmins,CN=Users,DC=MyLab,DC=localvalues.Click on Submit and wait until the workflow is successfully completed.

Sadly, there isn't a test to check whether your settings are correct as there is with the Configuration tool. Have a look at the test login described in the There's more... section of this recipe.
There is no workflow to restart Orchestrator Server, so you have to restart the Orchestrator Server another way:
In Windows, use services (vCenter Orchestrator Server)
In Linux, use the services command from the OS or use the Orchestrator Configurator (see the Tuning the appliance recipe in Chapter 2, Optimizing Orchestrator Configuration)
Reboot the Orchestrator Server
Now, try to log in to the Orchestrator Client using the AD user.
Configuring Orchestrator to work with an external authentication enables AD users to log in to the Orchestrator Client. The alternative would be either having only one user using it or adding users to the embedded LDAP. However, for a production Orchestrator, the embedded LDAP solution is not viable. As SSO is now a highly integrated part of vSphere, using Orchestrator with AD (or LDAP) isn't really such a good solution any longer. SSO can proxy multiple AD and/or LDAP domains and lets you integrate Orchestrator directly into vCenter as well as other corner pieces of VMware software offerings, making SSO integration the better choice for the future.
In the recipe above, we used the domain DNS address as the primary LDAP host rather than an individual AD server. The DNS entry for AD will forward the LDAP query to the next available AD server, which makes it a more reliable choice.
There are some things you should be aware of when working with LDAP.
In order to find out whether everything is working as it should, we need to test it. However, there is no workflow for this, so you have to trust your entries or use the Configuration tool.
Using the Orchestrator Configuration tool, click on Authentication.
Click on the Test Login tab.
Enter the Orchestrator Admin username and its password and click on Test Login.
Read the message carefully. It should be green and confirm that you can log in and that the user is part of the Orchestrator Admin group.

A red message mostly indicates that the user provided isn't in the LDAP or that the password is wrong.
If the message doesn't confirm an Orchestrator Admin group membership, review the membership of the user account.
When you encounter a problem while setting up LDAP, you will get an error code. This table shows the most commonly encountered error codes:
|
Code |
Meaning |
What to do |
|---|---|---|
|
525 |
User not found |
The user for login isn't found; check whether you have written the domain correctly. |
|
52e |
Password is incorrect |
Change the password in the password field. |
|
530 531 |
The User is not allowed to log in |
Access LDAP or AD and make sure that the user is allowed to log in remotely and from Orchestrator Server. |
|
532 |
Password expired |
Access LDAP or AD and set a new password. |
|
533 |
Account disabled |
Access LDAP or AD and enable the account. |
|
701 |
Account expired |
Access LDAP or AD and create a new account or use a different user. |
|
773 |
Must reset password |
The User has to reset the password on login. Access LDAP or AD to set a new password or use other methods to set a new password. |
|
775 |
User locked |
Access LDAP or AD and unlock the user account. |
Integrating Orchestrator into the vCenter Web Client enables vCenter Server users to directly run Orchestrator workflows just by right-clicking vCenter objects. The vRA-integrated Orchestrator is already configured with the SSO that vRA uses.
vCO 5.5 (and higher) requires an SSO server 5.5, as it won't work with an SSO 5.1 server.
We need an up-and-running Orchestrator as well as access to vCenter Web Client.
Make sure that you set the Orchestrator Network configuration (see the Configuring the network section in the Important Orchestrator base configurations recipe)
You should be comfortable with using one of the methods described in the Two ways to configure Orchestrator recipe.
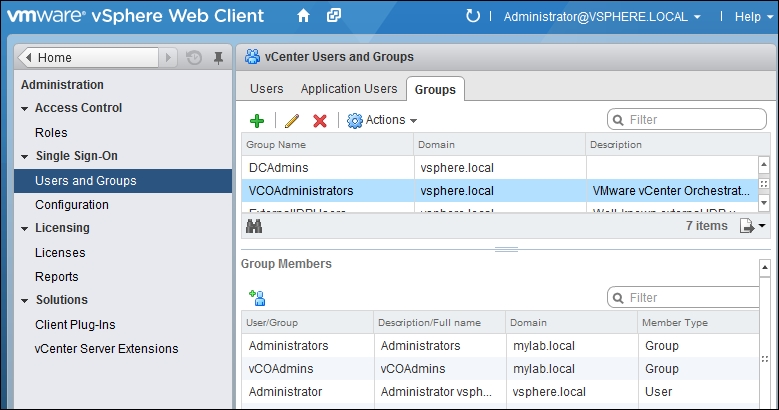
You should have an AD group for your vCOAdministrators with at least one user in it. You can use the precreated SSO group vCOAdministrators@vsphere.local. The account administrator@vsphere.local is a member of this group.
Again both configuration methods are shown. Choose the one you're most comfortable with.
If you are using the Orchestrator installation that came with vCenter, you can skip this step.
Click on the Network section and then on SSL Trust Manager.
Enter
[IP or FQDN of SSO server]:7444as the URL and click on Import.Acknowledge the import by clicking on Import.
Repeat steps 2 to 4 and register the SSL certificate for vCenter with port 443.
Click on the Authentication section.
Select the authentication mode as SSO Authentication.
Enter the SSO server FQDN.
Enter an SSO administrative user (for example,
administrator@vsphere.local).Click on Register Orchestrator.

Select from the drop-down menu the group you would like to use for Orchestrator administrators.
Click on Accept Orchestrator Configuration.

Navigate to Library | Configuration | SSL Trust Manager.
Right-click on the Import a certificate from URL workflow and select Start Workflow.
Enter
[IP or FQDN of SSO server]:7444as the URL.Select Yes to accept the SSL Certificate even if there are warnings and click on Submit.
Wait till the workflow has successfully finished.
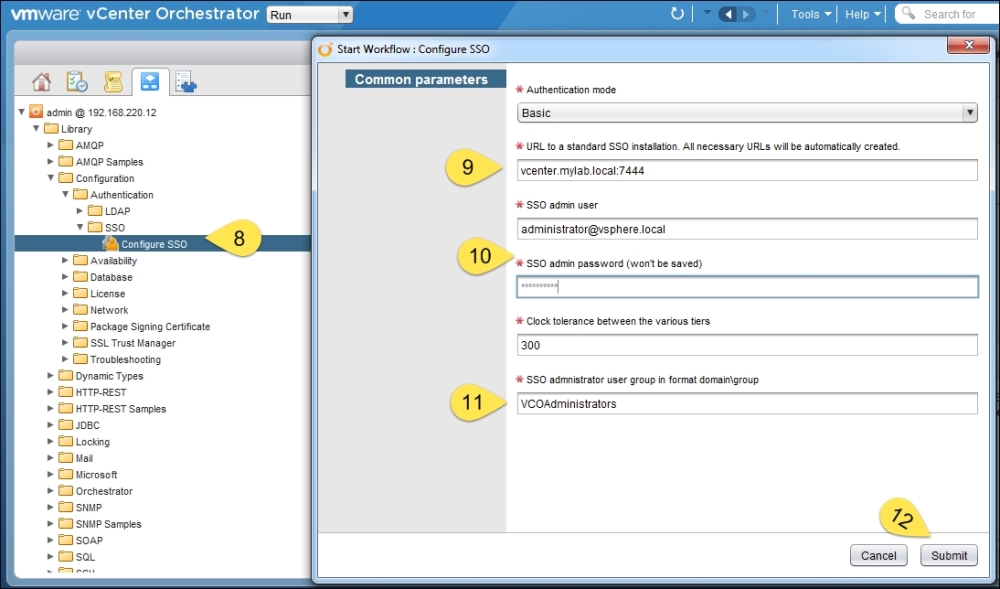
Navigate to Library | Configuration | Authentication | SSO.
Right-click on the workflow Configure SSO and select Start Workflow.
Enter
[IP or FQDN of SSO server]:7444as the URL.Enter an SSO administrative user (for example,
administrator@vsphere.local).Enter the SSO Admin Group (ignore if it says domain/group). The existing SSO default group is called VCOAdministrators (case-sensitive).
Click on Submit and wait until the workflow is completed successfully.
The integration of Orchestrator with vCenter Web Client requires us to also configure the vCenter Server plugin.
Navigate to Library | vCenter | Configuration.
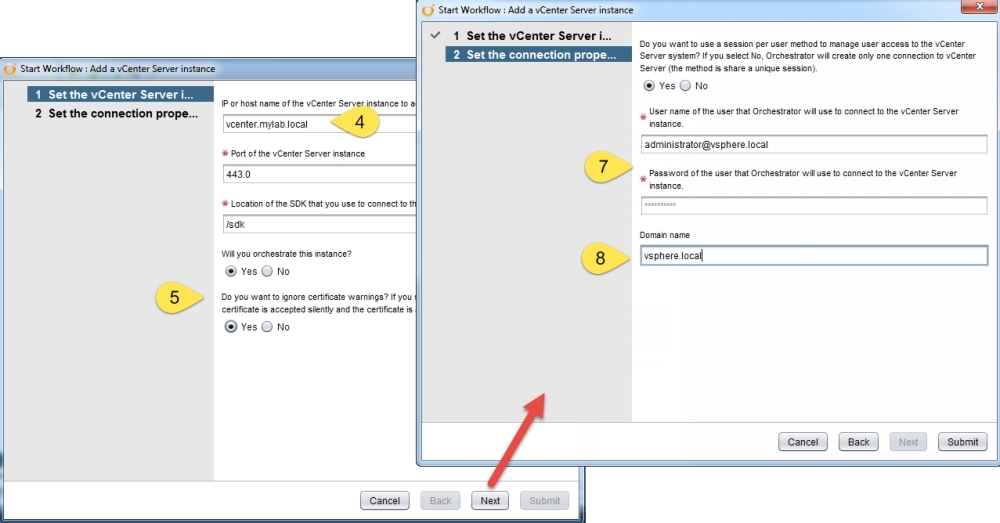
Right-click on the Add a vCenter Server instance workflow and select Start Workflow.
Enter your vCenter FQDN.
Select that you would like to orchestrate this instance as well and that you would like to accept SSL certificates even if they are self-signed.
Click on Next.
Enter a vCenter Server administrative user and the password.
You can define a domain name, or leave it empty. Click on Submit.
In the Web Client only one Orchestrator Server can be paired to each vCenter Server. To configure the pairing, follow these steps:
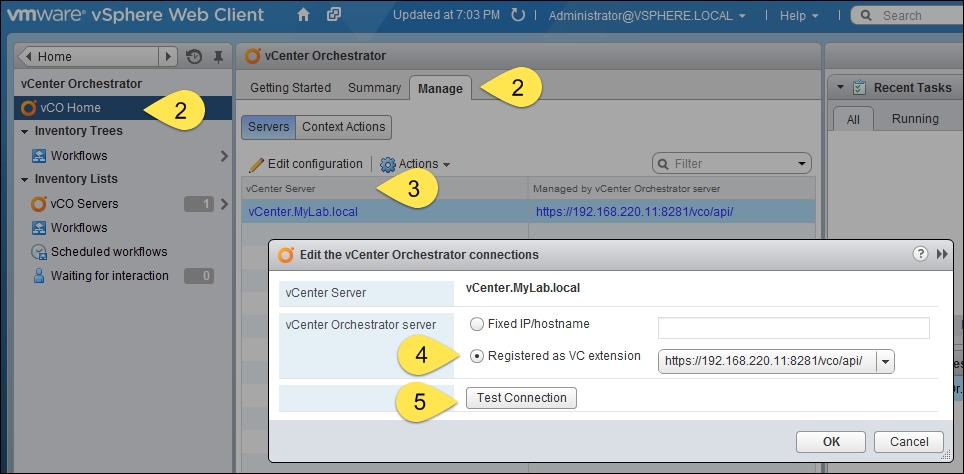
Open vSphere Web Client.
Click on vCenter Orchestrator and then on Manage.
Mark vCenter Server and click on Edit Configuration.
The server that you have integrated should show up in the Registered as VC extension selection. If this is not the case, you can try to enter its FQDN or IP.
Click on Test Connection and make sure it works. If it doesn't, this indicates that the integration hasn't worked correctly.
Click on OK.
Since vCenter Server 5.1, vSphere Web Client is (or better, should be) the main method for accessing vCenter. Orchestrator completely integrates with vSphere Web Client, making it possible for Orchestrator workflows to be executed directly from vSphere Web Client.

You can configure which workflows can be run from the vSphere Web Client. We will discuss this configuration in detail in the Orchestrator and vSphere Web Client recipe in Chapter 5, Basic Orchestrator Operations.
Using SSO for Orchestrator login requires that you log in into Orchestrator Client or vSphere Web Client using a user that is a member of the group you defined as vCOAdmins. If you used the VCOAdministrators@vsphere.local group, you can add other SSO and AD groups or users to this group via the SSO group membership configuration.
In this recipe, we will attach Orchestrator to an external database. This is a more secure and reliable method than using the embedded database.
We will need a database; the following databases are supported with vCO 5.5.2.1:
Oracle 11g
SQL Server 2005
SQL Server 2008
SQL Server 2012
SQL Server Express
PostgreSQL
You will need to create an empty database for Orchestrator, and you should also create a dedicated user account for Orchestrator to access the database.
You should be comfortable with using one of the methods described in the Two ways to configure Orchestrator recipe.
If your Database requires SSL, you will need to import the SSL certificate first; for this, see the Important Orchestrator base configurations recipe in this chapter.
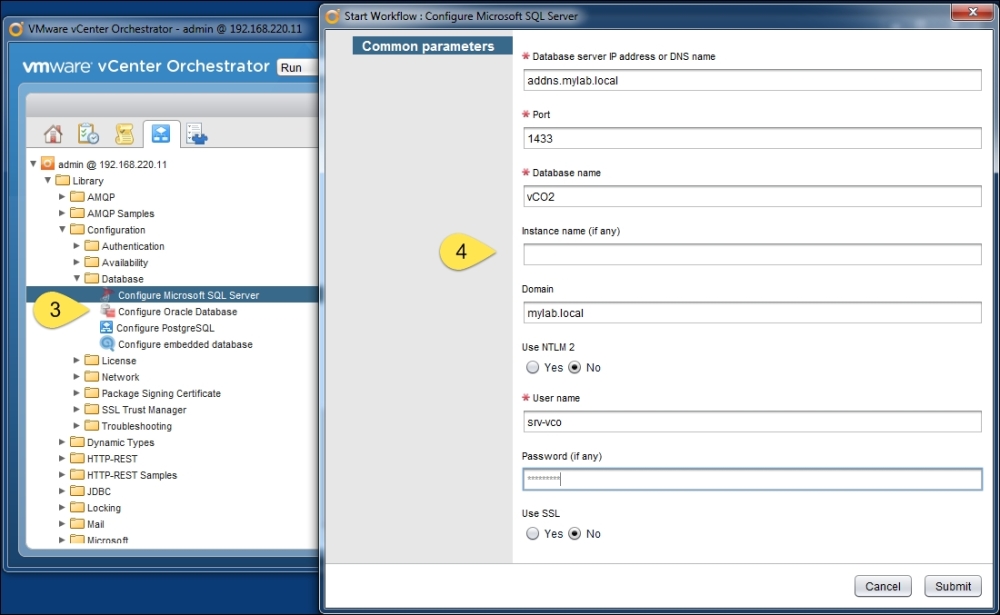
Both configuration methods will be shown; choose the one you prefer. In this example, we have added a SQL database to Orchestrator. The other databases are not that much different.
The following information is needed for each type of database:
|
Database type |
Oracle |
SQL Server |
PostgreSQL |
|---|---|---|---|
|
Login |
required |
required |
required |
|
SSL |
optional |
optional |
optional |
|
Hostname |
required |
required |
required |
|
Port |
1521 or custom |
1433 or custom |
5432 or custom |
|
Database name |
- |
required |
required |
|
Instance |
required |
optional |
- |
|
Domain |
- |
optional |
- |
|
Use NTLMv2 |
- |
optional |
- |
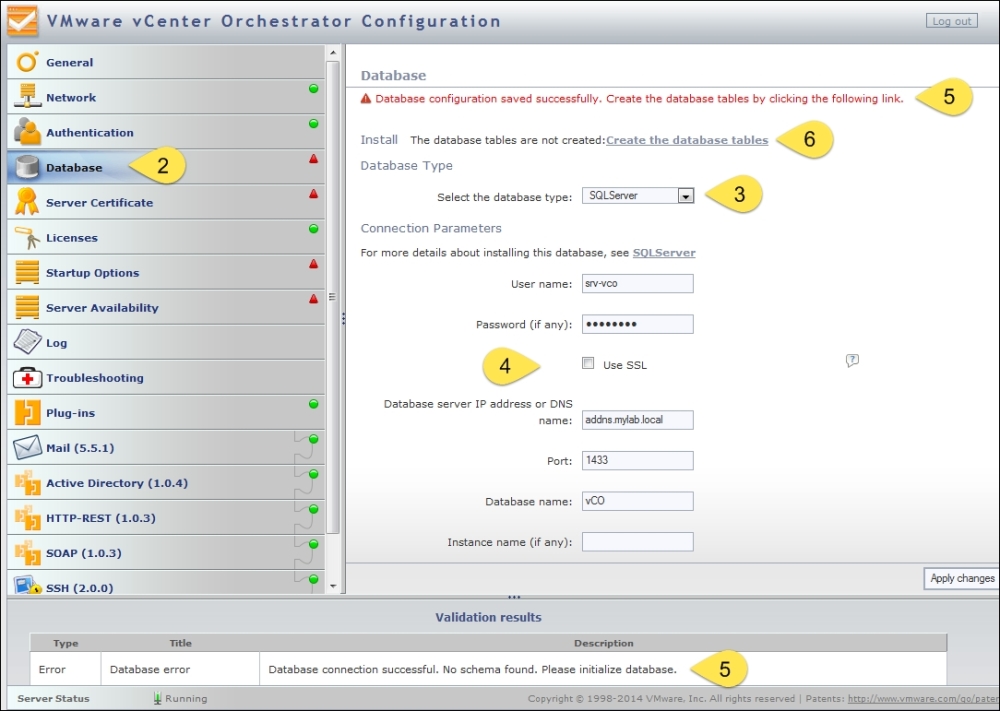
Click on the Database section.
Select the Database type. The information on the screen will adapt to your choice.
Enter all the relevant information and click on Apply changes.
An error occurs, which is totally OK. It just means that the database is empty and needs tables.
Click on the Create the database tables link.
Then click on Apply changes again.
The Orchestrator database contains the entire configuration, workflows, workflow runs, events, runtime information, actions, and a lot more. Therefore, it is quite important to consider using an external database. Without an external database, certain Orchestrator features, such as resuming a workflow after an Orchestrator Server crash, will not work or will be impaired.
All Orchestrator versions come with the embedded PostgreSQL database or use the vCenter Server database. A production environment dictates the use of an external database that integrates with the business continuity processes of your company.
In addition to this, the embedded database isn't really sized or optimized for large deployments and doesn't allow the use of Orchestrator Clustering.
Using the vCenter Server database for Orchestrator is not really a very pretty solution either. IT best practices dictate using dedicated resources for production environments. Putting the database on the same VM as Orchestrator is something to think about as it results in a competition for resources between the database and the Java process.
Sizing is hard to predict. Each workflow run consumes around 4 KB, and most objects (for example, vCenter Server Object) require around 50 KB each. VMware recommends 1 GB for a production database. The good thing is that Orchestrator regularly runs clean-up jobs to reduce the database content. Also have a look at the User preferences recipe in Chapter 5, Basic Orchestrator Operations, where we discuss certain properties that influence how much information is kept in the database.